Display a list of devices based on experience user group

I’m attempting to use an experience dashboard page to generate a list of devices matching a device tag value. The value is obtained from an experience user group. Each experience user belongs to a customer group, and each device has a Customer tag to match with the user’s Group. This defines a list of devices that are authorized to be viewed by that user.

I have tried to use the Device List, State Table, and GPS blocks but I am running into the same issue.

I don’t think I can template in the filter box when configurating the block and I’ve tried passing down a pageData object that contains the value of my desired tag but it doesn’t seem possible to use a context variable in a device tag query like this: Customer={{ctx.customerTag-0}}. Seems the idea of making this possible was discussed in the past in this Dashboards - Use context variable in device tag query

Is there another way to filter a list of devices dynamically based on tags when using experience dashboard pages?

Thanks

The best way to do this at the moment is to render the list of devices in the page layout. Each item in the list is then a link to a dashboard page (which is inside that layout) that uses context to show the clicked device.

device-dashboard

Here’s a detailed breakdown of each step in that process:

0. Create the device dashboard

The first step is to create the dashboard you’d like to use to display your device data. Make sure it’s properly configured with a device ID context variable. We’ll be passing this variable into the dashboard in later steps.

1. Set up relationship between devices and experience users

Using Experience Groups and Device Tags, you can configure a relationship between which users have access to which devices.

image

You can have as many devices as you’d like with the same group tag. For this example, I’ve added three devices that each have the group:acme tag. In later steps, we’ll be rendering a list of these devices to the user based on this group -> tag mapping.

2. Create the Experience Endpoint

Now we need an endpoint that can accept a device ID in the URL that can be passed to the dashboard via context.

image

In this example, I set the path to /devices/{deviceId}/dashboard. This will allow me to pass any device ID I’d like through the URL.

3. Create the dashboard page

Next, create a dashboard page that pulls the device ID from the payload. This page will display the dashboard created in step 0.

image

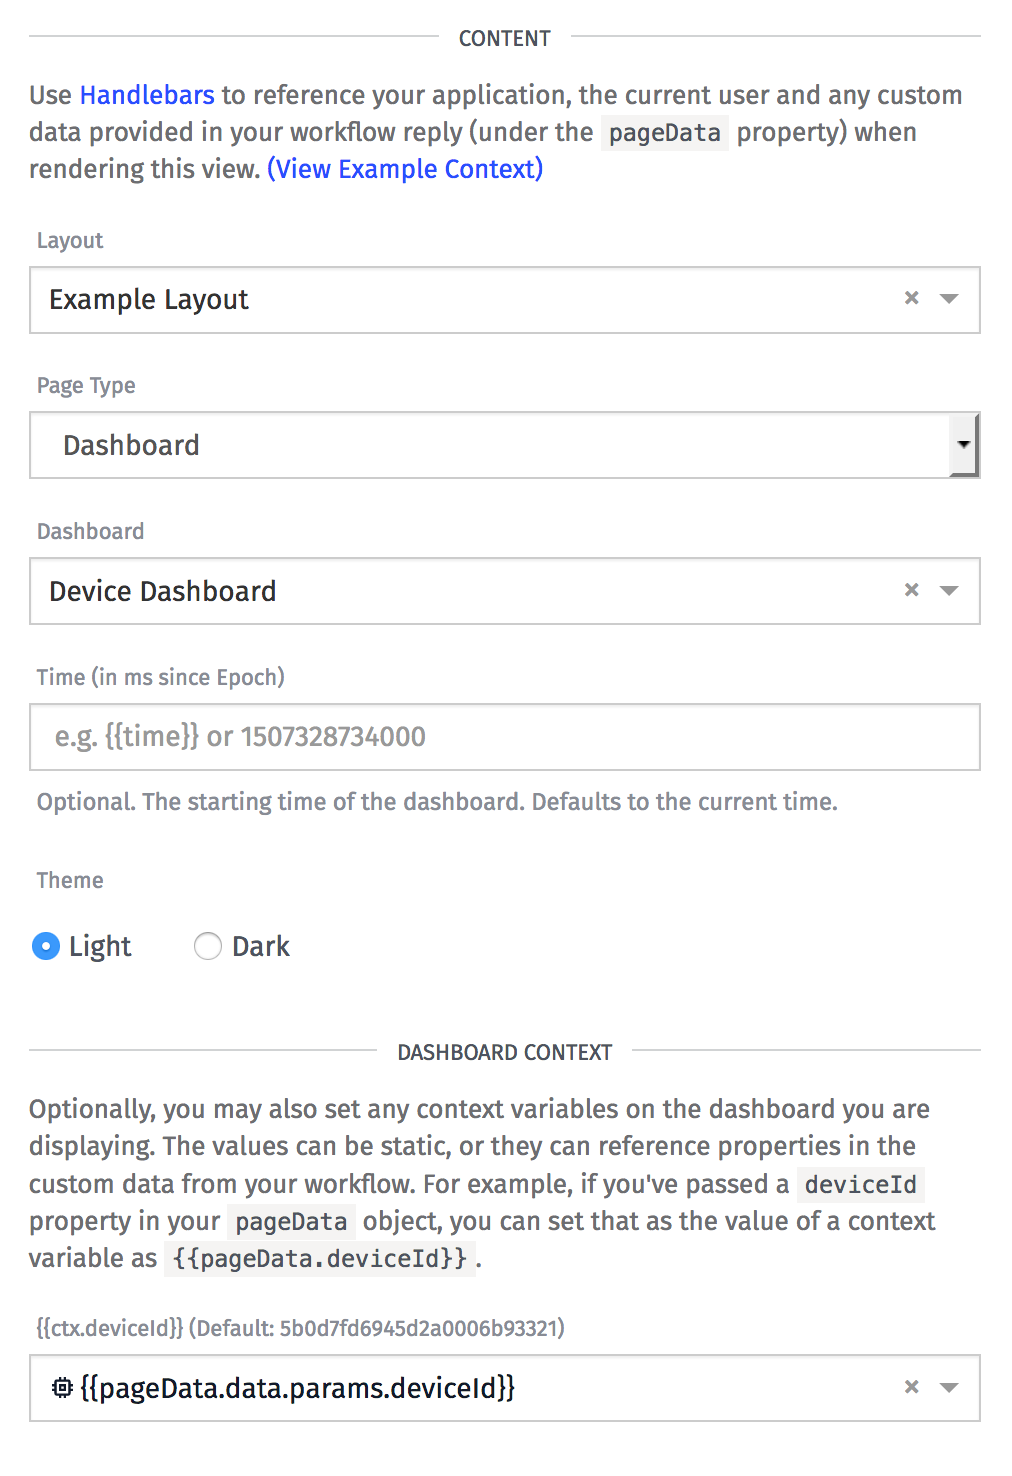
This page will be rendered by the /devices/{deviceId}/dashboard endpoint, which means whatever ID was passed into the URL will automatically be placed on the payload at data.params.deviceId. Inside Experience View templates, all payload data is available on the pageData object, so the resulting dashboard context value is:

{{pageData.data.params.deviceId}}

4. Render the dashboard page when the endpoint is requested

Create a workflow that’s triggered by the endpoint. All it does it render the dashboard page created in step 3.

Set the Reply Type to Experience Page. Choose the dashboard page you just created from the Page ID drop down. Lastly, select Full Payload from the Page Data Source drop down. That last setting makes sure the entire payload, which includes the device ID URL parameter is passed to the dashboard page.

Now when you request the page, you’ll see a device-specific dashboard. Here’s my example:

My example dashboard only has an indicator that’s rendering {{ctx.deviceId}} as it’s content. This way we can verify the correct device is being displayed.

5. Update the workflow to get the user’s devices

Now we need to update this workflow to add the current user’s devices to the payload. This is so we can render a list of them. This can be done by adding a single Get Device node.

If you do some test requests, you’ll see the user’s group is automatically added to the payload at experience.user.experienceGroups.[0].name. Since we added group tags to our devices, we need to query for all devices that have a group that matches the name of the user’s group. That means the tag query is the following:

group = {{experience.user.experienceGroups.[0].name}}

In this example, the results are added back on the payload at data.devices. If you save and request this page again, you’ll see the user’s devices on the payload.

6. Update the layout to render the device list

The last thing to do is update the page layout to render the previous obtained list of devices that the currently logged in user can see.

In this example, I’m starting the Example Layout that is generated for you. In the example layout, you’ll see a special helper called {{ page }}. This is where the actual page is placed, which in this case is the dashboard. I’ve expanded that to the following, which renders the list of devices with a link to their specific dashboard:

<div class="container-fluid">
  <div class="row">
    <div class="col-md-2">
      <div class="panel panel-default">
        <div class="panel-heading">My Devices</div>
        <div class="panel-body">
          <ul class="list-group">
          {{#each pageData.data.devices}}
            <li class="list-group-item">
              <a href="/devices/{{this.id}}/dashboard">
                {{this.name}}
              </a>
            </li>
          {{/each}}
          </ul>
        </div>
      </div>
    </div>
    <div class="col-md-10">
      <div class="panel panel-default">
        <div class="panel-heading">Details</div>
        <div class="panel-body">
          {{ page }}
        </div>
      </div>
    </div>
  </div>
</div>

The important addition is the {{#each}} that is looping over each device owned by this user and rendering them in a list with a link to a URL with its device ID. Now when you click on one, the page will reload and display the dashboard for the clicked device.

device-dashboard

With this as a starting template, you can start expanding on this concept for your specific application.

Thanks brandon

I missed one thing. Where does this.id and this.name come from?

Those are properties of the device objects that are added to the payload by the Get Device node.

The Handlebar {{#each}} helper iterates over an array, in this case it’s the array of devices. Each item in the array is available inside the loop on the this object. You can see a little more in the Handlebars documentation.

Perfect!

In our application, we are device up the dashboards to be linked to the tabs at the top: called “link link link” in your example page.

Any ideas how to have the device selector panel interact with the various types of dashboards on each link? E.g. we may be viewing Device A and want to look at sensor data, but another link may mean that we want to look at diagnostic messages, etc etc.

I’d probably create endpoints and dashboard pages for each category. Something like:

/devices/{deviceId}/sensor-data
/devices/{deviceId}/diagnostic-messages

Each endpoint would work a lot like the one I showed above, but would show a different dashboard with the information you require (sensor data, diagnostic messages, etc).

When you render the links, the device ID is available using {{pageData.data.params.deviceId}}. So my example top links would change to:

<div id="navbar" class="navbar-collapse collapse">
  <ul class="nav navbar-nav navbar-left">
    <li><a href="/devices/{{pageData.data.params.deviceId}}/sensor-data">Sensor Data</a></li>
    <li><a href="/devices/{{pageData.data.params.deviceId}}/diagnostic-messages">Diagnostic Messages</a></li>
  </ul>
  {{component "userIndicator"}}
</div>

Clicking one of those links would work exactly like clicking a device in my example list above. It would show the specific dashboard page (e.g. sensor-data) and pull the device ID context variable from the URL exactly like the example above.

That makes sense. But that could get a bit tricky if we are trying to use both the device selector list and the dashboard category links at the same time. The challenge being that we have an assortment of devices belonging to different group tags, and each device has various categories of information to see on a dashboard. Its a 2D selection you might say.

I was thinking perhaps of using the device selector to set a cookie at the current page the user is viewing, and then use the top links to change categories while being locked on the same device by way of getting the deviceId from the cookie. When the device selector is again used it would reset the cookie to the new deviceId.

Perhaps I’m overcomplicating the solution?

Cookies are a perfectly good way to go as well.

One reason to avoid them for this use case is that the user will not be able to copy/paste the URL to get back to the same spot. If you’ve noticed in the actual Losant platform, the entire context of what you’re looking at is always available in the URL. You can copy a URL and return to it at any point and you’ll always see the same thing.

However, if that’s not important for your use case, then cookies will absolutely work.

That’s a valid consideration.

Could we use both the device selection example you provided in this thread in combination with the dashboard categories link example to form a single URL with the entire context? I.e. render the sensor page with device N. Sounds like that might be possible but the user may need to first select the dashboard category link and then the device, and repeat the device selection each time they wish the change dashboard category.

I’d probably just make the device list URL link to either the sensor data or diagnostic data - whichever one you think should be the default. Then, whenever a device is clicked in the list, they’re automatically choosing the default dashboard category. The links on top then allow them to switch between the categories for that device if they want.

@Brandon_Cannaday

I got this working great! Thank you.

My one remaining challenge is that I have a a general fleet status page which is a dashboard page with a Device State block and a GPS History block. Since we cannot use context variables to filter by tags, is there another workaround to get those blocks to automatically filter to include only devices matching a tag?

There is currently no work-around for tag filtering, however the team is actively working on tag context variables, so you may not have to wait too long. I can’t give you an exact date, though.

A short-term workaround would be to create duplicate dashboards that have the tags hard coded in the configuration. You then just display different dashboards depending on what “tag” of devices a user wants to see. This will work if you only have a few tags, which means you only have to create a few duplicate dashboards.

If you go to your dashboard list, you will see a “Clone” button the right, which will make it quicker to make copies once you’ve got one of them built.

ok thanks. The tag context variable sounds like it will greatly increase the power of the platform, which is already great!

In my case, I’d need to clone the Experience Pages as well, since they are custom branded. And there is no Clone button on those like there is for Dashboards. So that might be a Feature Request.

You could get away with a single Experience Page by swapping the branding in the template based on the user’s group. Something like this:

<a class="navbar-brand" href="/" style="padding-top:0; padding-bottom:0;">
  {{#eq pageData.experience.user.experienceGroups.[0].name "client A"}}
    <img alt="Logo" style="margin-top:13px; height: 24px;" src="clientA.png">
  {{/eq}}

  {{#eq pageData.experience.user.experienceGroups.[0].name "client B"}}
    <img alt="Logo" style="margin-top:13px; height: 24px;" src="clientB.png">
  {{/eq}}

  {{#eq pageData.experience.user.experienceGroups.[0].name "client C"}}
    <img alt="Logo" style="margin-top:13px; height: 24px;" src="clientC.png">
  {{/eq}}
</a>

You could also expand on this concept by storing brand-specific values in a Data Table. Then in the workflow, you can request a users “brand” from the data table and add it to the payload, which can then be accessed in page layout’s template:

<a class="navbar-brand" href="/" style="padding-top:0; padding-bottom:0;">
    <img alt="Logo" style="margin-top:13px; height: 24px;" src="{{pageData.brand.logo}}">
</a>

That’s a great way to swap out branding, and it gives me a very useful idea.

But the current purpose is to change out the Dashboard with a different hard coded tags based on the user experience group. Since that Dashboard is hosted by an experience view, i think I need to have a version of the experience page for each hard coded tag. I don’t need to swap the branding template (at least right now), I just need to swap out the dashboard inside the page based on the experience group.

The actual dashboard that’s displayed in a dashboard page can also come from the payload. So you could store the branding and overview dashboard ID required for each user group in a DataTable. Then you can configure the dashboard page to pull the actual dashboard from the payload.

@Brandon_Cannaday

If I wanted to get the dashboard that’s displayed to come from the payload, can I still reference dasbhoard context properties in custom data coming from my workflow? I tried passing down the dashboardId but once that is specified in the name, it sets the Dashboard Context to status values only.

Here’s a screenshot showing the configuration I believe you’d need.

You’d first set the Dashboard property to a template that references your payload. As a reminder, anything the workflow sets as the context will be made available on the pageData object. In this example, the dashboard I want to display is set by the workflow and added to the payload at myDashboardId.

When using a template as the dashboard ID, the editor no longer knows what variables are available, so you’ll just get a list of text fields. In this example, I’m setting the deviceId context variable to another value on the payload stored at myDeviceId.

Hi Brandon. Are the layouts etc of this example available from a repository? I modified the Example Layout instead of creating a new variant and overriding, and need to get back the original Example Layout w/o creating a whole new Experience. Thanks